Showing posts with label bathrooms. Show all posts

Monday, March 28, 2016

Layers

Today I went to the new house to do some serious scrubbing to prep for painting. The water wasn't on yet so I drove over carefully with a bucket of hot water in the passenger side floor board. Just a few drops escaped when I turned into the drive - success! One hearty splash of vinegar and a few big squirts of blue Dawn dish detergent later and I donned my yellow cleaning gloves to get to work.

It was there on my knees crawling along with my scrub brush that I began to think about the family who had lived in this house before. I found a quarter peeking out from the edge of the baseboard and pocket it. I'm up about 86 cents since we started. See? This house is already turning a profit! But back to the history of the house. I wonder about the previous family.

In no time at all thirty minutes had passed and two men from the water department arrived to turn on our water out at the street. After ensuring nothing came gushing out at the valve down in the basement, I thanked them at the door. The one in the neon jacket told me he'd been in the house multiple times turning the water back on for them. I explained that the house had been foreclosed on when we purchased so that kind of made sense. He mentioned the previous owner had driven a little volvo. That struck me as so odd that he would remember that little detail. The family is now gone from the house, but not forgotten as it's residents. As we peel back the layers from the house, we get to see a little glimpse into the lives they lived in this house too.

Now back to the work we're doing. The main bathroom had powder blue tiles going halfway up the walls. I spent some time chipping them off with a hammer and pry bar one at a time. Every once in a while, I would hit the jackpot and four tiles would come off at once! Underneath the blue tile I was surprised to find... more tile! But this tile was flush with the drywall so I left it. We will tile over it with something fresh. The bottom layer of tile was originally white before being painted a burgundy color and then a minty green color on top of that before it was finally tiled over with the light blue tiles. Whew! That's a lot of styles for one bathroom. I ripped out the linoleum floor next. Daniel took out the vanity, toilet and pried out the rusty inserts from the built in medicine cabinet. We'll be trying to salvage the tub with a good deep clean and just spruce it up with new controls, spigot and fresh caulk.
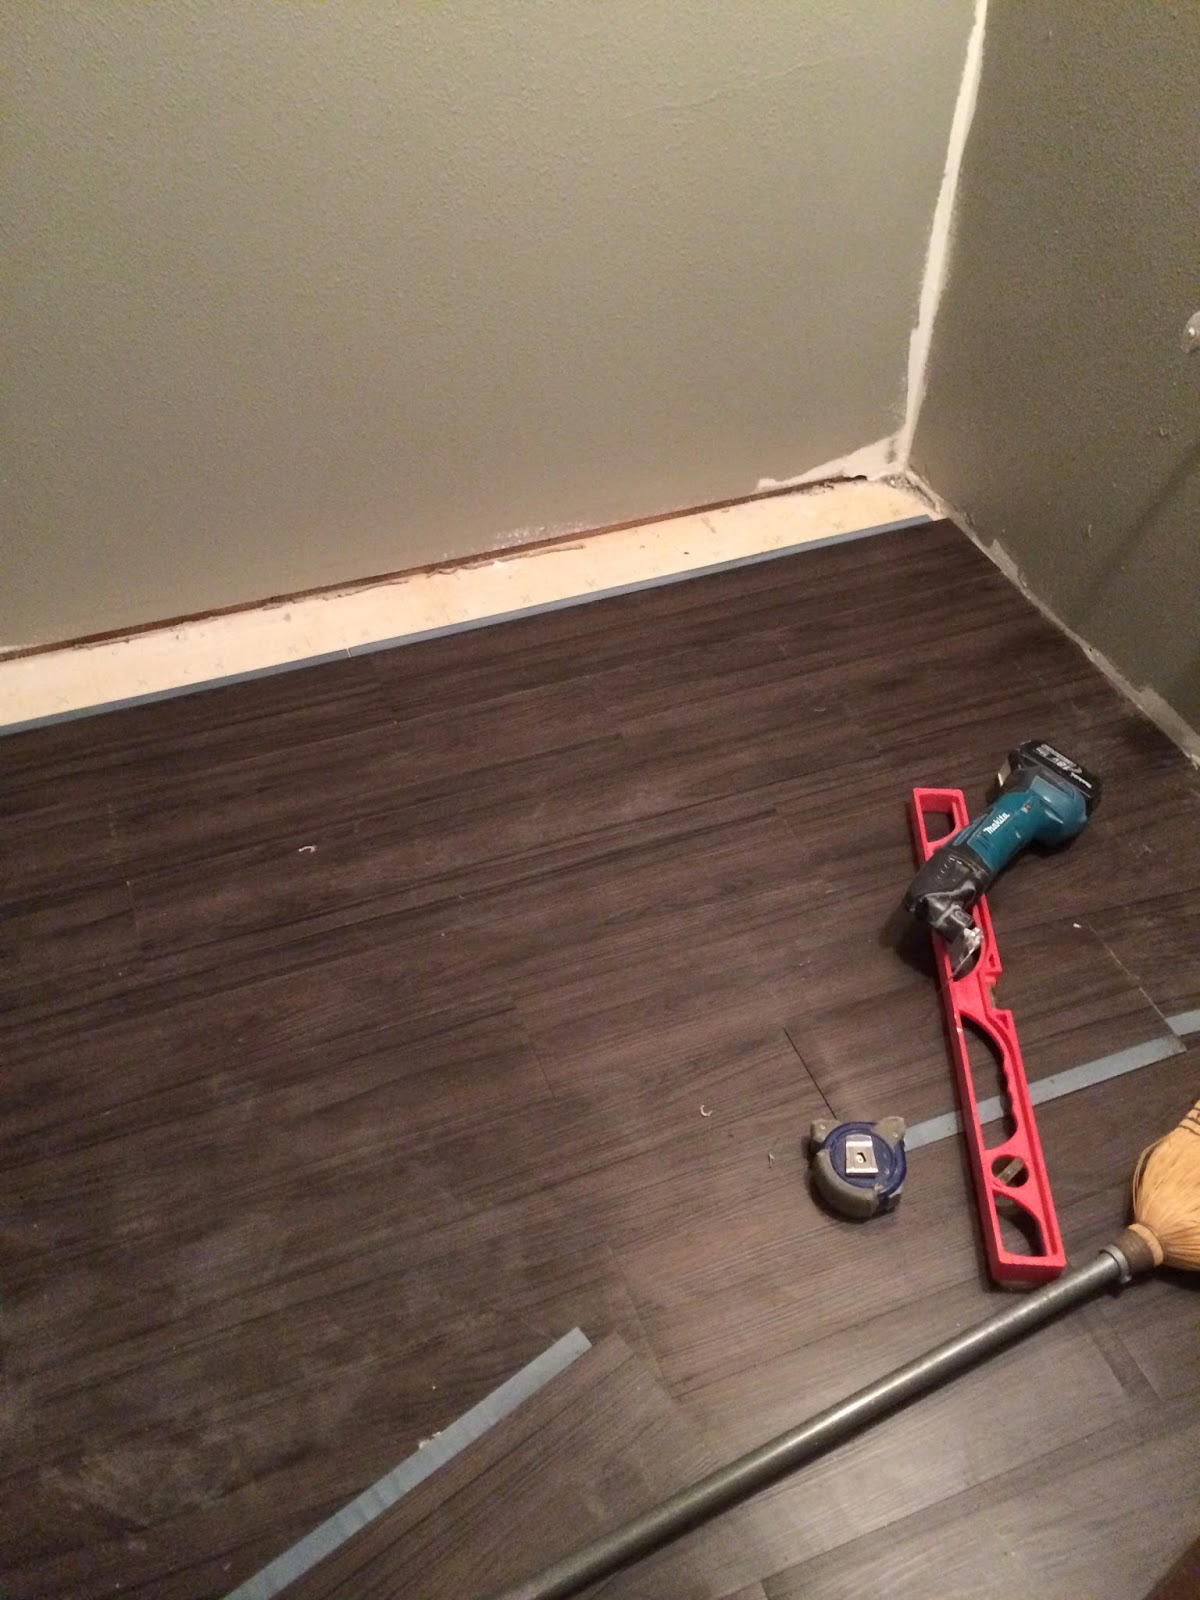
Daniel is the true visionary in this marriage. He can always visualize the way something will look in a room. Sometimes he has an idea and I'm skeptical. I usually give in to his idea and find out he was right and it looks awesome. Here's yet another example. He picked this tile for the bathroom. I wasn't sold on it but we needed to make a decision so I agreed. 
I think the floor looks awesome! Here's a little secret. This isn't real tile! It's a stickable vinyl tile that you can grout between. I love it. It was a good price and he got the whole thing done in just a couple hours after church Sunday night. I should know better by now and trust his judgment. After all, he did choose me. :) 

Next to go was the wall tile, vanity and linoleum in the master half bath. When he pulled the mirror down, he found a fun little surprise. You can see the original siding from before the master was added on. Neat! This bathroom had pink wall tiles painted over with white. Under the vanity was a layer of the tiny 1" by 1" tiles. The floor must have been this style before they put the linoleum down.
 
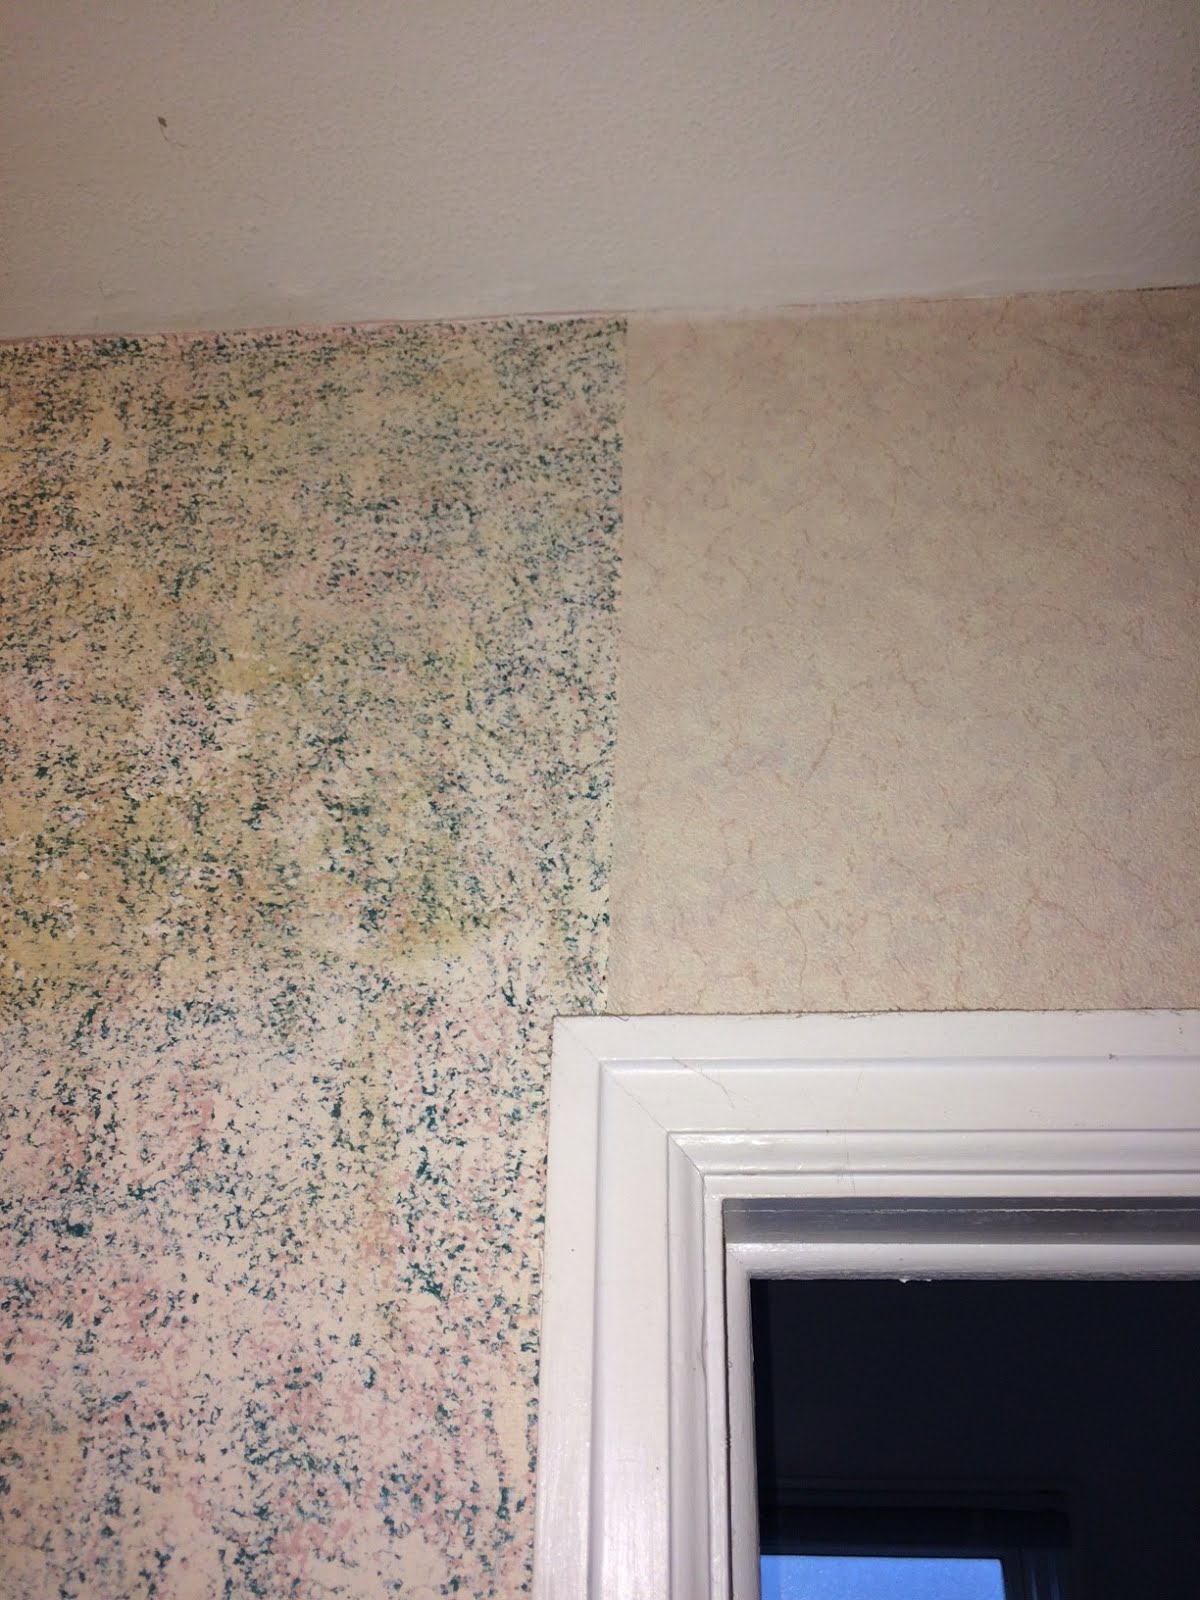
Every single house we have bought has wallpaper that has to go. Wallpaper removal is basically the bane of my existence. For once though, I was pleasantly surprised. I don't know what type of paper this was, but it peeled off extremely quick in large strips. I didn't even have to use the steamer. Under the wallpaper in the hallway, I found some three color sponge rolled paint someone had taken a lot of time to do. I'm pretty happy this paint technique has gone out of style... In this picture, the paint is on the left, a strip of the wallpaper is on the right.
Our biggest concern now is the kitchen floor. Daniel pulled up a layer of linoleum, two sheets of of plywood and a layer of the thick linoleum tiles he had to painstakingly chip up before he finally found that there was indeed hardwood at the bottom of it all. However, the hardwood is covered with some sort of tar glue. We are having all the hardwood floors throughout the house professionally refinished. Yes, this is something we could do ourselves. But we just don't have the time before our move date. So we'll trust the pros with that job. We're crossing our fingers that they'll be able to sand through this crazy layer of black to get to the wood underneath in the kitchen.
 

So that's where we are. Just peeling back a little more of the layers of this house each day, discovering more of it's secrets. A house is just a structure with four walls and a roof, right? Yet somehow this little building is so much more. Even with this house, knowing we don't plan to stay in it long and are investing in it with a "business" mindset, I can't seem to hold it at arm's length. Every minute we spend working, planning, cleaning, renovating, I pour a little more of myself into it. It's not just a house. It's a home. And while it may not be our home for too long if things go as planned, it will be someone's home. That's what makes it special. We get to add our own little layer to this home. We become a part of it until someone comes in later and peels our work back just as we're doing now.


Until then, keep dreaming with us!

Thursday, April 3, 2014

Day 25-27 - Renovation Rollercoaster

Tuesday

As you may have read in the previous post, we heard a drip coming from inside the powder room wall where we had installed the toilet directly above in the guest bathroom .  The plumber came out to take a look.  Remember the 4 layers of vinyl flooring we ripped out?  Well when you only replace it with one layer, the existing flange for the toilet is now too high.  Hence the wobbly toilet and bad seal.  So they put the toilet up on shims and we are going to seal the gap with caulking.  Problem solved!  Or so we thought.

That evening we went back to the house to take a look at the toilets and new vanities that went in upstairs.  Everything looked great until we saw this in the powder room...
That's a wet sub-floor.  So the leak wasn't just caused by the uneven toilet.  Another phone call to the plumber and he was back that evening.  My fears came true - they cut into my beautifully textured and freshly painted wall and ceiling.  But the good news?  I didn't cry about it.

The powder room and eat-in area of the kitchen both have a hole in the ceiling.  There's a one-inch slit in the large drain pipe that carries the water away from both of the upstairs bathroom.  Our plumber couldn't fix it, so he referred us to a certified plumber who would have the right tools (a torch, I believe) to fix such a large pipe.  The piece he needs should be in Friday to get the leaking section replaced.  We'll see how my wall/ceilings look after the patch!

On the bright side, the new vanities look lovely.  While a double vanity is awesome, neither of the bathrooms have a ton of space where the vanities go.  We probably could have squeezed in one with two sinks, but there would have been hardly any counter space.  Any gal getting ready in the morning will probably agree that counter space is a more precious commodity than another sink.  All three bathrooms have coordinating vanities in different sizes/configurations based on the space.  The guest bath is on the left with the master bath vanity shown on the right.  It's a little different but I liked having the different height pieces for the master.

Wednesday
The laminate installers arrived at 9 am to get started laying the Pergo flooring in the entryway, powder room, kitchen and dining room. This was one of those jobs that Daniel definitely could have done.  However, it's a big job!  And time = money.  Lowe's had a special to install the laminate at just 99 cents/sq foot.  At that price, it was worth it to save Daniel's limited time for other projects!

When they got there, they were concerned about the unevenness of the floor.  They spent most of the day patching the floor and leveling it so we would not have transitions between the entry/hall and rooms.  They will be returning to finish on Friday.  I will be so glad to not have anymore sub-floor showing in the house!  We've been walking on that dusty stuff for 4 weeks.  Watch for before and after pictures in the next post!

Thursday
Good fortune struck for the Goodwins! Our kitchen counters are currently situated to accommodate a slide-in range, where the controls are on the front and the counter goes behind the stove to overlap a bit in the back.  Typically, a slide-in costs at least double a traditional range so we planned on cutting the extra counter before we tiled to make room for a regular stove. 

On Wednesday, Daniel was browsing the Lowe's website and clicked on a stainless steel Samsung slide-in that you had to "add to your cart" to see the sale price.  Regular price was $1,800 (way too much to be spending on a stove).  In his cart, the price showed as $647 before tax.  That's a great price even for a regular range!  He quickly took a screen shot, then clicked to purchase it before they found what had to be an error in the price. 

Today he got an "Oops" email from Lowe's saying they had to cancel his order and would be sending him a "we're sorry" gift card.  Daniel called Customer Service to say he that he wanted the stove and didn't want the order to be cancelled.  The gal told him the range was in stock at our local Lowe's and could be picked up today.  Daniel rushed to Lowe's and picked up our new $1,800 stove, which was supposed to be on sale for $1,500, for less than $700 after tax.  Now that's a deal! 

Here's a partial look at the completed shower.  Grout should be done by this weekend.  It's been a busy week for us in other areas of our lives so we haven't been able to do as much as we would've liked to.  The real world carries on even while we hang in renovation limbo.  We are hoping to move in about two weeks.


Keep dreaming friends!

Tuesday, April 1, 2014

Days 22-24 - Power Tool Convert

Saturday
I have a confession - I've been avoiding the blog.  These last few days have been, well, a little frustrating.  I avoided writing any new posts so I wouldn't have to admit it out loud!  But it's the truth and anyone who's done any remodeling to their home knows that some days just kind of stink.  Sometimes it gets hard and you think to yourself, "Will this ever end?"

Saturday we went to the house with the goal of getting one bathroom up and running - the guest bath.  Daniel had already laid the floor so all we needed to do was get the trim boards in and install the toilet and vanity.  No problem, right? So we thought.
We are putting white trim boards throughout the house.  While vacationing with his family in Branson, MO, Daniel convinced me he really needed a new saw - a Rigid 10" sliding miter saw - that was on a great sale at the Tanger factory outlet store.  Getting it home was interesting since he also had to get the giant stand with it, but we made it work.  Well I'm glad we got it now!  It works great for cutting the trim boards at a much more precise angle than his old saw.  I tried my hand at it.  One thing I learned, test to see where the blade is actually going to come down before cutting - don't trust the laser!

I worked on (in my opinion) the nastiest thing in the bathroom, the wax ring for the toilet. That thing seriously grosses me out.  However, it had to be done.  So I scraped up the old wax ring to ready the flange for the new ring.  The flange had a screw missing but I didn't think too much of it because I assumed it kind of all sealed together once the weight of the toilet was on it.  We kept the existing toilet because it was relatively new and just needed a good cleaning.  In our last house, the plumbing had been winterized two years before we bought it.  I scrubbed those toilets more times than I can count before the ring from the winterizing chemicals came out.  So I can handle a dirty toilet any day. 

Anyways we got the new toilet set with the new wax ring in place.  However, there was way too much wiggle in the unit after we had tightened the nuts to hold it in place.  This was probably my fault for not speaking up about the loose/missing screws in the flange.  Daniel flushed it a few times and no water appeared to be leaking so we went downstairs.  That's when I heard it.  A drip, drip drip was coming from inside the wall we had just replaced with new drywall in the powder room which is directly above that bathroom.  It sounds like we may have a leak.  I think I might cry if we have to rip out that beautiful fresh wall that was just textured and painted...  But we aren't sure so  our plumber is coming out on Tuesday.  It's possible the dripping sound was just inside the pipe and not actually dripping inside the wall.  I'm praying that's it!  We turned off the water and took the toilet back up.  To be safe, we are having the plumber install the toilet and vanity in this bathroom so he can check things out.

Sunday
Daniel worked on painting the doors of the built in linen closets above the stairs and in the master bath as well as the stringers on the stairs.  The wood was sanded down and primed, then sprayed with a semi gloss white paint.  Apparently the semi gloss is supposed to hold up better against wear and tear so it's what we will be using on all the doors in the house.  The carpet will cover over the edge of the steps.  We're still deciding what we want to do with the existing balusters and handrail.  Right now it's a bit dangerous at the top of the stairs with just a gaping opening since the banisters on the landing were removed by the previous owners.  So we will either paint or replace the existing pieces on the bottom half of the stairs, depending on what we find for the upstairs banisters. 


I guess what was frustrating about those two days is it just felt like not much progress was made.  The one major thing we tried to accomplish didn't go over well, and now we're worried about a leak.  We're starting to really feel anxious to move into the house.  There's so many of these small things (like painting a closet) we could do even easier if we lived there.  So hopefully we'll get to a place soon where we've achieved a livable status!

Monday
Today was exciting because I got to try something new - tiling!  Daniel is pretty good at tiling and has done it quite a bit.  That's how he convinced me to buy a new Rigid 7" tile saw on sale at Home Depot a year or so ago even though he had no projects going at the time.  It's turning out to be another good tool investment.  This new saw gives a pretty clean and accurate cut on the tile from the Restore for our master bath shower walls.  We decided to add a small accent row of the fancy glass tile from Home Depot.  We only needed 4 sheets of the accent tile, but those 4 sheets actually cost more than all the boxes of full-sized tile for the shower walls from the Restore.  I don't regret spending the extra money for the glass tile, but I do think it's kind of funny when you compare the cost.  That's why we shop Restore!  I'm loving how it's turning out and love it even more knowing I helped put it up.
I'll post another photo after we've grouted because that always makes a huge difference.  The only downside of this shower, no cut outs or ledges for all our soaps.  The existing walls just didn't really allow for it without going to a lot of trouble.  No worries though, I know I can get some handy suction caddies to hold our stuff.  Those ledges and cutouts just look prettier.  The tile will go all the way to the ceiling and I think it's going to look awesome!

I think Daniel is loving that I'm into our renovation project so much.  Before, when he would talk about wanting a new tool, I would always go through the whole spiel of, "Do you really need that?  Why can't you just use this tool you already have?  What specifically are you going to use that for?"  But now, I'm thinking, "Yeah we definitely need a table saw.  Maybe we could get one for our anniversary in May?  I'll have to watch the sale papers..."  It's a whole new me!  Congratulations babe, you've converted me.  Now that I see the difference that the right quality tool can make, I'm hooked.

The more I learn to do, the more I dream of doing!

Wednesday, March 26, 2014

Day 18 - What would YOU do?

Tuesday
I think my hand is soon going to be permanently scrunched in a "brush-holding" position.  I guess that's what happens when you've been painting for six days in a row.  On the bright side, we are ALMOST done!  Daniel's brother Josh was so kind to come over again last night to help while his wife and girls babysat Maria.  He got the second coat rolled in the dining room and bathrooms.  He's an awesome brother!
I just have to get a few more rooms cut and then I can be done painting for a while, hallelujah!  And the good news is, I got the scary job over with.  My least favorite thing to paint is the stairway due to having to climb up high on a ladder to paint.  It always freaks me out.  I never used to be afraid of heights but the older I get... yeah, I was a little nervous.  I couldn't help envisioning losing my balance just enough to throw the paint tray I was holding all over the new carpet on the upstairs landing.  That would have been very upsetting.  Fortunately I kept my balance and all went well.
Daniel worked on installing the flooring in the guest bathroom.  We typically tile in the bathrooms - Daniel is awesome at tiling - but couldn't find a tile we loved so decided to try something different.  The Restore had boxes of Allure Vinyl Plank flooring in "Iron Wood" color.  I'm usually not a big fan of vinyl flooring but this looked kind of cool and modern.  My biggest complaint about bathroom floors is how cold it is in the morning.  This seemed like it would be a bit warmer than tile so we thought we'd give it a try.  If we hate it, we can always pull it up later and tile.  So far I think it looks neat, and it's definitely "softer" and warmer than tile. 

So now I'd like to ask for YOUR opinion.  In our gray rooms, how would you decorate?  Would you stick to a mostly monochromatic theme or do a bold color to offset the gray?  The dining room will have white wainscoting eventually with a medium dark Pergo floor.  The bathrooms have the gray walls with white trim and now you can see the flooring color in the upstairs baths. 

I have a small painting that I bought from a street artist in London back in 2009.  It's a white canvas with a black outline-type painting of a couple walking down the street with Big Ben up ahead.  They are holding a bright red umbrella.  It caught my eye because of the splash of red on the black and white canvas.  Perhaps there's something there to work with.  What would you do? 

I look forward to hearing your thoughts to help us keep dreaming!

Friday, March 14, 2014

Day 1-4 - Gutting

I'm playing catch up for the past week so these first few posts will be combining work days.  We started work Friday, March 7th, the day after our closing.  The photos in yesterday's post were taken when we inspected the home before closing.  Just to clarify, the furniture and stuff you saw was not ours.
For this remodel, we have chosen to hire out some of the work that technically we could do ourselves.  With Daniel working full time and me caring for a baby who cannot be apart from me for more than 3 hours, we knew we only had so much of our own time.  We'd like the house to be ready to move in before, say, 2015.  Hence the hired help.  I told Daniel that I'd like him to teach me everything he knows so that with the next house we buy, I can just do all the work while he's at the office during the day. :)  We all have dreams!

Friday
On Friday our fun began.  It was such an exciting day at the house with work being done everywhere simultaneously.  Here's a recap of what went down that first day:

  1. Dumpster Delivery - This house has plenty to throw out!  We rented a 20-yard dumpster that is currently adorning our driveway.  Not very classy but certainly necessary.
  2. Carpet - A 2-man crew ripped out all the dirty smelly carpet from all 3 floors.  Did you know when you purchase new carpet through Costco the rip-out and moving your furniture come free?  Never say no to free labor!  You also get a $100 Costco gift card for every $1000 spent.  Just thought I'd share in case you're looking for new carpet and happen to be a member of my favorite store.
  3. Linoleum - Another worker chipped up all the linoleum from the entry, hall, kitchen and all 3 bathrooms.  In some areas, he found up to 4 layers!
  4. Bathrooms - Three plumbers came in and ripped out the vanities from the bathrooms.  They also took out the old tub in the master bath.  We found a surprise with their tear out - mold in the drywall around the master shower and behind the vanity in the powder room.  The drywall was cut out in those areas.
  5. Trim - Daniel tore out all the trim in the entire house.  He certainly got his money's worth out of his hammer and pry bar that day.
  6. Haul Away - I was the haul-away girl.  I ran all over the house collecting the junk and hauled it outside to the dumpster.  I threw away countless trim boards, a bathroom sink, bags of trash the previous owners had left (thanks for that), and all the blinds/drapes from the house.
  7. Wallpaper & Killz Primer - Items 1-6 were done in the morning.  That evening we returned with Daniel's brother, Josh, and his wife, Haley, to work some more.  Josh and Daniel started rolling Killz on the walls and ceilings to help seal out the smoke smell.  Haley and I did my least favorite activity... wall paper removal.  Seriously people, NEVER put wallpaper in your house unless you are just wanting to punish whoever buys it next.
Here are some photos from Friday:
Ok so this photo is obviously posed, but I did actually use the pry bar to remove all the nails left behind in the walls where Daniel removed trim.  Tedious but necessary task.
Josh rolled on the Killz nice and thick in the living room.
Master Bath Shower - New bathtub installed and walls with insulation ripped out due to mold.  We will be installing cement board, sealed against moisture around the tub and tiling the shower walls.

Unfortunately the guys began to roll Killz on the ceiling before realizing our furniture needed to be covered in plastic.  Guess I have some gentle scraping to do when we move in.  I'll let you know how that turns out.

Haley peeling wallpaper one tiny strip at a time in the dining room.  It went faster later when we figured out what we were doing.
Saturday
Derrick, Daniel's brother-in-law came to help us on Saturday morning.  He rolled more Killz on the walls and ceilings of the kitchen, hallway and den.  Derrick is an artist.  I think it just about killed him to just roll the primer on without carefully cutting in all the corners like he usually does.  He's the ultimate perfectionist when it comes to painting!

Daniel and I worked on getting off the 3"x3" tile on the walls of the master bathroom.  I was surprised at how tricky that job was.  Using a pry bar and hammer, the tiles kept breaking in half instead of prying off in one piece.  To help make the job go faster, Daniel pulled out this cool tool that I had never seen before.  I think my mom actually got it for him for Christmas off his wish list.  Here's the tool:
Makita Multi Tool
He used this to cut the grout lines between the tiles.  After the grout was cut, I was able to quickly pry off tiles one by one.  They came off as whole tiles so the job went much faster.  So thanks Mom, that tool rocks!

Sunday
Sunday is our day of rest (as it should be).  We don't want to get burnt out so we've decided no heavy labor on Sundays.  Daniel went over to let out our dogs (they are staying at the house amidst the chaos) and I'm pretty sure he did some work too, against our own rules.  Just can't keep the man down!  I believe this is what he did Sunday.
Master Bath - The walls were pretty damaged behind the tiles.  We decided against tiling these walls for now, so the wall will need new sheetrock.  He cut out the old and also removed a medicine cabinet mirror from the wall.
Monday
I went to the house during the day on Monday to finish removing the wallpaper in the dining room.  When Daniel and I returned that evening, we took down the borders in the nursery and master bedroom.  Wallpaper removal complete!  Boy was I glad to have that over with.

We also got started on the kitchen cabinets.  Oh how I would love to rip out the kitchen completely and put in a new one!  But as I've learned from watching HGTV, a full kitchen remodel seems to run between $20-30K once you include the appliances.  Since we have to buy new appliances, we've got to find ways to update the kitchen without breaking the bank.  So we're going to paint the cabinets, install new hardware and tile the countertops.  Only time will tell if we can pull off a makeover using the existing materials.  I'm keeping my fingers crossed.
Cabinet Makeover - Step 1: Prime the wood.  We experimented with a paint sprayer for the first time to apply the primer.  The primer was thick, perhaps a little too thick for the sprayer.  It seemed to work slightly better after a little water was added.  We took turns spraying and applying coats with a brush. 

So that's a recap of our first 4 days with the house.  It was fun tearing it all apart, but now it's time to put it back together!  Stay tuned for the next post covering days 5-8.  After that, I promise the posts will get shorter with only 1 or 2 days covered at a time.

Fun Fact!  Including the hired workers and help from family we've received, we have put 96 hours of work into the house over the last 7 days.

Dream big!